
Achieving those beautifully charred, smoky edges on shrimp tikka is a small kitchen victory worth chasing. It’s not just about the flavor, but that satisfying crunch and slightly crisp exterior that contrasts with the tender, juicy shrimp inside. I’ve found that unconventional tools like a cast iron skillet or finishing under the broiler can really amp up that smoky, charred effect, making every bite feel a little more special.
This recipe is a reminder that you don’t need a tandoor to get those authentic, slightly blistered edges. It’s about understanding the heat and finding the right moment to crank up the flame—whether on the stove or under the grill. The goal is to coax out those caramelized, smoky notes that make shrimp tikka irresistibly crave-worthy, even if you’re working with a humble kitchen setup.
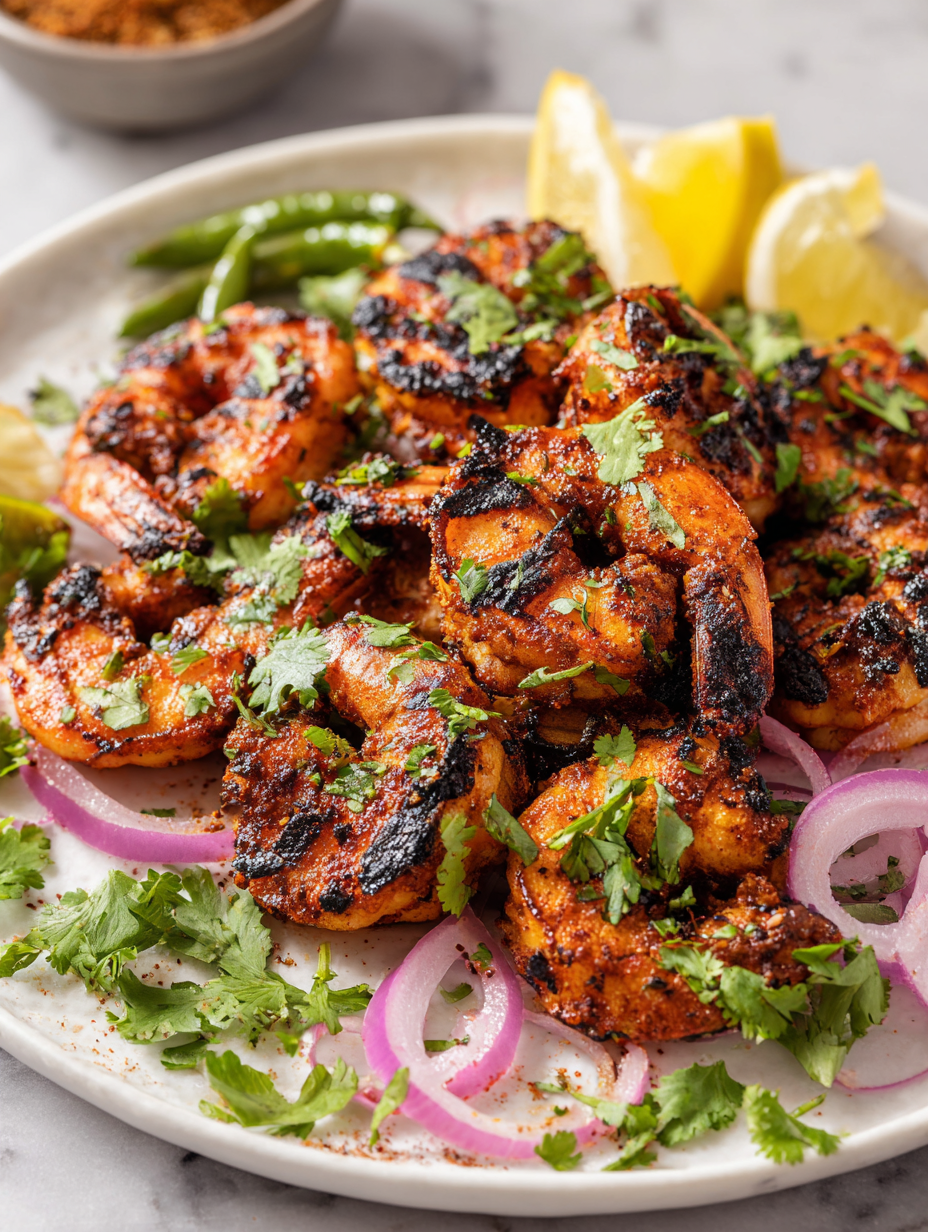
Focusing on the smoky, charred edges of shrimp tikka and how to achieve that perfect, slightly crisp exterior while keeping the inside tender and juicy, using unconventional methods like cast iron or broiler finishing.
Chasing smoky edges
- Learning to perfect that smoky char on shrimp tikka was a small victory I’ll never forget.
- I get a thrill every time I manage to keep the shrimp tender and juicy inside, despite the high heat.
- That first bite with a slight crisp and a burst of spicy marinade reminds me why I love cooking on weekends.
- Chasing those slightly blistered edges has become my quiet obsession in the kitchen, especially after a good marinade.
- Sharing this dish with friends always sparks nostalgic stories of street food stalls in India, even in my tiny apartment.
The inspiration behind this dish
- One evening, I was marinating shrimp for a quick weeknight dinner and remembered how my grandmother used to toss shrimp in her own blend of spices, sitting by the stove with a glass of chai steaming beside her. That memory of her hands mixing and tasting, always adjusting, made me want to recreate something that felt both nostalgic and fresh. It’s funny how a simple dish like shrimp tikka can carry so many stories and memories, even in a small kitchen.
- That night, I started experimenting with different spice blends and cooking methods, aiming for that perfect smoky char while keeping the shrimp juicy inside. It’s about those little moments—when the shrimp crackle on the cast iron, or when you catch a whiff of smoky paprika—that make all the difference. Now, this dish isn’t just a recipe; it’s a way to bring a piece of those childhood evenings into my busy life, no tandoor needed.
- heading: Short personal story or inspiration behind the recipe
Trivia and origins of shrimp tikka
- Shrimp tikka has roots in Indian coastal cuisine, where fresh seafood was marinated in vibrant spices and cooked over open flames.
- The dish was popularized in the North Indian tandoor kitchens but adapted easily to home grills and broilers around the world.
- Historically, the smoky, charred edges of shrimp tikka symbolize the influence of Mughal cooking techniques, emphasizing bold flavors and high heat.
Key ingredients and tips
- Shrimp: I prefer wild-caught, firm shrimp that hold up well on high heat, with a sweet, briny aroma that intensifies as they cook. Swap for prawns if you like a slightly meatier bite.
- Yogurt: Use thick, full-fat Greek yogurt for a rich marinade that clings beautifully and adds a tangy depth. If dairy-free, coconut yogurt works but will mellow the spice flavors a bit.
- Spice mix: I love a blend of smoky paprika, cumin, coriander, and a pinch of cayenne—think warm and slightly sweet with a fiery kick. Adjust the cayenne for more heat or swap with chili powder if you prefer milder.
- Lemon juice: Brightens everything with a zesty punch and helps tenderize the shrimp. Skip if you’re out—just add a splash of vinegar or a squeeze of lime instead.
- Garlic & ginger: Fresh minced garlic and grated ginger give a fragrant punch that awakens the marinade. If pressed for time, use pre-minced garlic and ginger paste, but fresh really makes a difference.
- Oil: A good drizzle of neutral oil like vegetable or canola ensures the marinade coats evenly and helps with charring. Olive oil adds a slightly fruitier note, but avoid extra virgin at high heat.
- Optional herbs: Chopped cilantro or mint adds a fresh, herbal brightness at the end. If you dislike cilantro, parsley is a fine substitute, but skip if you want a more reserved flavor.
Spotlight on key ingredients
Shrimp:
- I prefer wild-caught, firm shrimp that hold up well on high heat, with a sweet, briny aroma that intensifies as they cook. Swap for prawns if you like a slightly meatier bite.
- Yogurt: Use thick, full-fat Greek yogurt for a rich marinade that clings beautifully and adds a tangy depth. If dairy-free, coconut yogurt works but will mellow the spice flavors a bit.
Spice mix & lemon:
- Spice blend: I love a smoky paprika, cumin, coriander, and cayenne mix—warm, slightly sweet, with a fiery kick. Adjust cayenne for more heat or swap with chili powder for milder flavor.
- Lemon juice: Brightens everything with a zesty punch and helps tenderize the shrimp. If out, a splash of vinegar or lime works just as well.
Notes for ingredient swaps
- Shrimp: I prefer wild-caught, firm shrimp that hold up well on high heat, with a sweet, briny aroma that intensifies as they cook. Swap for prawns if you like a slightly meatier bite.
- Yogurt: Use thick, full-fat Greek yogurt for a rich marinade that clings beautifully and adds a tangy depth. If dairy-free, coconut yogurt works but will mellow the spice flavors a bit.
- Spice mix: I love a blend of smoky paprika, cumin, coriander, and a pinch of cayenne—think warm and slightly sweet with a fiery kick. Adjust the cayenne for more heat or swap with chili powder if you prefer milder.
- Lemon juice: Brightens everything with a zesty punch and helps tenderize the shrimp. Skip if you’re out—just add a splash of vinegar or a squeeze of lime instead.
- Garlic & ginger: Fresh minced garlic and grated ginger give a fragrant punch that awakens the marinade. If pressed for time, use pre-minced garlic and ginger paste, but fresh really makes a difference.
- Oil: A good drizzle of neutral oil like vegetable or canola ensures the marinade coats evenly and helps with charring. Olive oil adds a slightly fruitier note, but avoid extra virgin at high heat.
- Optional herbs: Chopped cilantro or mint adds a fresh, herbal brightness at the end. If you dislike cilantro, parsley is a fine substitute, but skip if you want a more reserved flavor.
Equipment & Tools
- Cast iron skillet or grill: Provides high, even heat for charring.
- Small mixing bowl: For marinating the shrimp.
- Tongs: Handles shrimp safely during cooking.
- Brush: To apply marinade or oil as needed.
Step-by-step guide for shrimp tikka
- Equipment prep: Gather a cast iron skillet or grill, a small bowl, tongs, and a brush. Ensure your pan is dry and clean.
- Marinate shrimp: In a bowl, mix yogurt, spice blend, lemon juice, garlic, ginger, and oil. Add shrimp, coat well. Cover and chill for 30 minutes.
- Preheat your pan or grill: Heat the cast iron over medium-high heat until hot, about 200°C/400°F. For the grill, get it to high heat and clean grates.
- Cook shrimp: Place shrimp in the hot skillet or on the grill. Cook for 2-3 minutes per side, until edges blister and shrimp turn opaque with a slight char.
- Crackle and color check: Look for darkened, slightly smoky edges and a crackling sound. Shrimp should be firm but tender inside.
- Finishing touches: If using a skillet, optionally broil for 1-2 minutes to enhance charring. If on grill, rotate to char all sides evenly.
- Rest briefly: Transfer cooked shrimp to a plate, let rest for 2 minutes. This helps juices redistribute and keeps them juicy.
- Plate and garnish: Serve hot with a squeeze of lemon, chopped herbs, and a side of naan or salad. Enjoy that smoky aroma.
- Final check: Shrimp should reach an internal temperature of 60°C/140°F, firm to touch, with a lightly charred exterior. Look for vibrant color and aroma.
Transfer shrimp to a plate, sprinkle with fresh herbs and lemon. Let rest briefly to lock in juices. Serve immediately with your favorite sides.
How to Know It’s Done
- Edges are blistered and slightly charred, with a smoky scent.
- Shrimp is opaque and firm but not rubbery.
- Internal temperature reaches 60°C/140°F for safety and juiciness.
Smoky Cast Iron Shrimp Tikka
Ingredients
Equipment
Method
- In a small bowl, whisk together Greek yogurt, smoked paprika, cumin, coriander, cayenne, lemon juice, minced garlic, grated ginger, and oil until smooth and fragrant.
- Add the shrimp to the bowl and toss well to coat all pieces evenly with the marinade. Cover and refrigerate for at least 30 minutes to let the flavors meld and the shrimp tenderize.
- Preheat your cast iron skillet over medium-high heat until shimmering hot, or prepare your grill for high heat. The pan should be very hot to achieve those blistered, smoky edges.
- Using tongs, place the marinated shrimp in the hot skillet or on the grill grates, spreading them out in a single layer. Let cook undisturbed for about 2-3 minutes until edges start to blister and darken.
- Turn the shrimp over carefully with tongs and cook for another 2-3 minutes, watching for blistered, smoky edges and a slight crackling sound as they sizzle and char.
- If using a skillet, you can finish with a quick 1-2 minute broil to intensify the charring. Keep a close eye to avoid burning.
- Remove the shrimp from heat and transfer to a plate. Let rest for 2 minutes to allow juices to settle and keep them tender.
- Garnish with chopped cilantro or mint, squeeze fresh lemon over the top, and serve immediately with naan, rice, or a fresh salad.
Notes
Pro tips for perfect shrimp tikka
- Bolded tip: Use a cast iron skillet for intense, smoky sears and even heat distribution.
- Bolded tip: Marinate shrimp for at least 30 minutes—this deepens flavor and helps with caramelization.
- Bolded tip: Preheat your pan or grill until very hot—look for shimmering surface or slight smoke before adding shrimp.
- Bolded tip: When cooking, look for blistered, slightly charred edges and a crackling sound for perfect doneness.
- Bolded tip: Finish under the broiler for 1-2 minutes if you want extra smoky, crispy edges.
- Bolded tip: Rest the cooked shrimp for 2 minutes before serving—this keeps them juicy and tender.
- Bolded tip: Keep an eye on the shrimp to prevent over-torching—reduce heat or flip more frequently if needed.
Common mistakes and how to fix them
- FORGOT to preheat the pan → Always heat the skillet before adding shrimp to prevent sticking.
- DUMPED marinade too early → Let shrimp rest for at least 10 minutes to develop flavor and char.
- OVER-TORCHED shrimp → Reduce heat or cook in shorter bursts to avoid burning and bitterness.
- MISSED resting period → Rest cooked shrimp 2 minutes for juicier, more tender results.
Quick fixes and pantry swaps
- When shrimp release a lot of juice, splash a little oil to prevent steaming.
- If shrimp stick to the pan, increase heat slightly and avoid overcrowding.
- Splash vinegar on over-charred bits to mellow bitterness and lift smoky aroma.
- Patch undercooked shrimp with a quick 30-second high-heat sear for extra color.
- Shield delicate shrimp with a piece of foil if edges turn too dark during final broil.
Prep, store, and reheat tips
- Marinate the shrimp up to 2 hours ahead; keep refrigerated to develop deeper flavor and easier prep.
- Store marinated shrimp in an airtight container in the fridge; the marinade helps tenderize and infuse flavor over time.
- Cooked shrimp are best enjoyed within 24 hours; store in an airtight container in the fridge, where they stay juicy and fragrant.
- Reheat gently in a skillet over low heat or in a warm oven (about 150°C/300°F); avoid microwave to preserve texture and smoky aroma.
- When reheating, look for a slight crackle and aroma of smoky spices, indicating the shrimp are warmed through without drying out.
Top questions about Shrimp Tikka
1. How do I choose the best shrimp for tikka?
Use fresh, firm shrimp with a sweet aroma; they hold up better to high heat and stay juicy.
2. Can I marinate the shrimp overnight?
Marinate for at least 30 minutes, but up to 2 hours enhances flavor and helps with charring.
3. How hot should the pan or grill be?
Preheat your cast iron or grill until it’s shimmering hot, around 200°C/400°F, for best searing.
4. How do I know when the shrimp are done?
Cook for 2-3 minutes per side until edges blister and shrimp turn opaque; avoid overcooking to prevent toughness.
5. What should the shrimp look and sound like when cooked?
Look for darkened, blistered edges and a slight crackle sound. Shrimp should be firm but tender inside.
6. What if the shrimp stick to the pan?
If shrimp stick, give them a gentle nudge with tongs and increase heat slightly. Avoid overcrowding the pan.
7. Can I finish it in the oven?
Finish under the broiler for 1-2 minutes if you want extra smoky, crispy edges.
8. How should I reheat leftover shrimp tikka?
Reheat gently in a skillet over low heat or in a warm oven to preserve flavor and texture.
9. How can I add more smoky flavor?
For extra smoky flavor, add a dash of smoked paprika or a quick splash of vinegar during cooking.
10. What common mistakes should I avoid?
Avoid over-marinating or high heat for too long, which can cause rubbery texture and burnt edges.
Cooking shrimp tikka with that smoky, slightly crisp exterior feels like a small, satisfying victory every time. It’s a dish that reminds me how simple ingredients can transform with a bit of heat and patience. Sharing it with friends always sparks conversations about flavors, memories, and the joy of getting it just right.
In the end, it’s about those moments—when the shrimp crackle in the pan and the aroma fills the room—that make this dish worth every effort. It’s quick, honest, and a little messy, but always deeply rewarding. And honestly, it’s a spicy, smoky hug for your taste buds, even on the busiest nights.